Adding Game Entities
Adding Game Entities (Armor, Spells etc.)
Description
After hours and hours of staring at the xml files and browsing restless through the georges editor, i finally could shed some light into the mysteries of entity creation in Ryzom Core. There is still much to learn but this is a good point to start to share my knowledge i gathered so far.
So what we're going to do is creating an armor item including a crafting plan and two spells (Heal & Dmg) plus some more spell credits. We're going to put them on both server (shard) and client. Finally, we are adding them to some corresponding merchants & trainer (NPC).
Note 1: For the sake of simplicity in this guide I oriented myself at the old spells and armor. Of Course, the goal of Ryzom Core is not to rebuild the original Ryzom. But in my opinion it will take some time till we have e.g. some truly new spells as this also relies heavily on source code additions. Until then it should be ok if we create some more samples to get to known with the whole process.
Note 2: Personally i think the current georges editor has much potential, but most times im kind of overwhelmed by the masses of editable informations.
So i switched to just open the actual xml files and edit them. I decided to do it for this guide as well which also saves me from making a lot of screenshots :) But of course you are welcome to do it all in the offical Nel tool!
If you don't like to read, videos are available
Prerequisites
Here is a small list with stuff you should have ready for things to work.
- Get the source
Look here for more information
Note: For windows there are some prebuild binaries for everything (client, server, nel tools, ryzom tools). Look at Downloads for Windows to find out more.
- Client / Server
Well this should be clear but of course you need a working client to test the additions and a working server with access to it as we have to add files on it. There are a bunch of tutorials in the wiki for the plattform of your choice. E.g.:
- Char with admin rights
Create a character on your server and grant it some privileges.
This can be done by using the EGS (Entity Game Service - part of the server) command "setPriv 1 :DEV:" when the corresponding user is logged into the Client, or by directly altering the corresponding table entry for your character in the mysql database on the server.
Note: If you have more than one character on your server you need to change the EGS command to "
setPriv x :DEV:" where x is the id of the char found in the mysql database
- NeL tool "make_sheet_id"
This tool is needed to create the sheet_id.bin file which is residing in $RYZOM_HOME/code/ryzom/common/data_leveldesign/leveldesign/Game_elem. Therefore build it and make it ready for use. It can be found in $RYZOM_HOME/code/nel/tools/misc/make_sheet_id.
Use it with the following syntax to build your sheet_id.bin (also produce sheets.txt) :
make_sheet_id_r -oL:/leveldesign/game_elem/sheet_id.bin L:/leveldesign/game_elem L:/leveldesign/game_element L:/leveldesign/world
Note: To get working make_sheet_id tool you need set allowed extensions or simply just delete or comment ExtensionsAllowed = { "sample_config" }; line in $RYZOM_HOME/code/nel/tools/misc/make_sheet_id.cfg
$RYZOM_HOME/code/build/bin/make_sheet_id -o$RYZOM_HOME/code/ryzom/common/data_leveldesign/leveldesign/Game_elem/sheet_id.bin $RYZOM_HOME/code/ryzom/common/data_leveldesign/leveldesign/Game_elem/ $RYZOM_HOME/code/ryzom/common/data_leveldesign/leveldesign/World
- Ryzom tool "sheets_packer"
This tool is needed to build the .packed_sheets files from the contents in your leveldesign directory. It can be found $RYZOM_HOME/code/ryzom/tools/sheets_packer. Build it and make it ready for use. When executing, it will default create the .packed_sheets in $RYZOM_HOME/code/ryzom/client/data.
cp $RYZOM_HOME/code/build/bin/sheets_packer $RYZOM_HOME/code/ryzom/tools/sheets_packer
cd $RYZOM_HOME/code/ryzom/tools/sheets_packer
./sheets_packer
cd $RYZOM_HOME
Ryzom assets
Its really nice to have the ryzom media assets available. E.g. the Interfaces directory contains all the icons for spells and stuff. You could search for them online at http://media.ryzom.com/ but having them locally is much faster. Bear in mind that all assets, if extracted, are like 11GB in 26k files.For linux command lines : we assume tthat the path to your asset is set in $ASSETS_PATH
- bnps
For creating armor its nice to have some of the bnps available unpacked to look for nice shapes you want to use. Download the Open Ryzom Client extract it and look into the data directory. There you will find all the .bnp files. Use the NeL tool bnp_make to unpack the files. The easiest way to do so is to copy the desired bnp and the executable in a directory and using following command. This will create a directory with the name of the file and unpack all contents there.
bnp_make /u desired_bnp.bnp
sbrick_words_en.txt / skill_words_en.txt / item_words_en.txt
It comes in handy if you have these files open. The first three can be found in the $RYZOM_HOME/code/ryzom/server/data_shard/language directory. They are needed later to find the correct skill families and item names (more on that below).
- sheets.txt
This file gets created if you repack your sheets with the mentioned sheets_packer tool. It contains a human readable overview of the contents of the sheet_id.bin and can be used to find out correct file naming as we're orienting on the original ryzom file scheme. It lies in the same directory as the sheet_id.bin.
Adding Armor
File naming constraints
Each craftable item needs a .sitem file which defines the characteristics of the item and a .sbrick file which defines the crafting plan for the item (eg which material is used). As kaetemi already stated in his armor example: "Craftable items MUST be prefixed with "ic", bricks for crafting MUST be prefixed with "bc"". As we orient ourselves to the ryzom naming scheme there are some more rules to learn. But more on this in the next paragraph
File extension, Skill Families, Icons etc.
- To get correct .sitem file naming we are looking into the item_words_en.txt (in the $RYZOM_HOME/code/ryzom/server/data_shard/language directory)
- To get correct .sbrick file naming we are looking into the sbrick_words_en.txt (in the $RYZOM_HOME/code/ryzom/server/data_shard/language directory)
- We can double check with the sheets.txt if the file names are appearing there (in the $RYZOM_HOME/code/ryzom/common/data_leveldesign/leveldesign/Game_elem directory)
Below is a table with some examples for the naming scheme for matis armor .sitems and there corresponding .sbricks . There is a lot more to discover if you skim through these files but this should be sufficent to get the idea.
| SItem | SBrick | |||
|---|---|---|---|---|
| filename | description | filename | description | |
| icmalb | item craftable matis light boots | bcmaea01 | Heavy Boots - Basic Quality | |
| icmalv | item craftable matis light vest | bcmaea02 | Heavy Gloves - Basic Quality | |
| icmalg | item craftable matis light gloves | bcmaea03 | Heavy Helmet - Basic Quality | |
| icmalp | item craftable matis light pants | bcmaea04 | Heavy Pants - Basic Quality | |
| icmals | item craftable matis light sleeves | bcmaea05 | Heavy Sleeves - Basic Quality | |
| icmamb | item craftable matis medium boots | bcmaea06 | Heavy Vest - Basic Quality | |
| icmamv | item craftable matis medium vest | bcmaea07 | Light Boots - Basic Quality | |
| icmamg | item craftable matis medium gloves | bcmaea08 | Light Gloves - Basic Quality | |
| icmamp | item craftable matis medium pants | bcmaea09 | Light Pants - Basic Quality | |
| icmams | item craftable matis medium sleeves | bcmaea10 | Light Sleeves - Basic Quality | |
| icmahb | item craftable matis heavy boots | bcmaea11 | Light Vest - Basic Quality | |
| icmahv | item craftable matis heavy vest | bcmaea12 | Medium Boots - Basic Quality | |
| icmahg | item craftable matis heavy gloves | bcmaea13 | Medium Gloves - Basic Quality | |
| icmahp | item craftable matis heavy pants | bcmaea14 | Medium Pants - Basic Quality | |
| icmahs | item craftable matis heavy sleeves | bcmaea15 | Medium Sleeves - Basic Quality | |
| icmahh | item craftable matis heavy head | bcmaea16 | Medium Vest - Basic Quality | |
The character combination in front is equal to the FamilyId defined in each .sbrick file
For the crafting plans we need to know the corresponding skills involved
- To get the correct skill family we are looking into skill_words_en.txt (in the $RYZOM_HOME/code/ryzom/server/data_shard/language directory)
Below is a table with some example skills we are going to use and there skill family. This should give you an sufficent idea.
| skill familyId | skill description |
|---|---|
| SCALBEM | Master Light Boots Crafting |
| SCALGEM | Master Light Gloves Crafting |
| SCALPEM | Master Light Pants Crafting |
| SCALSEM | Master Light Sleeves Crafting |
| SCALVEM | Master Light Vest Crafting |
| SCAMBEM | Master Medium Boots Crafting |
| SCAMGEM | Master Medium Gloves Crafting |
| SCAMPEM | Master Medium Pants Crafting |
| SCAMSEM | Master Medium Sleeves Crafting |
| SCAMVEM | Master Medium Vest Crafting |
| SCAHBEM | Master Heavy Boots Crafting |
| SCAHGEM | Master Heavy Gloves Crafting |
| SCAHHEM | Master Heavy Helmet Crafting |
| SCAHPEM | Master Heavy Pants Crafting |
| SCAHSEM | Master Heavy Sleeves Crafting |
| SCAHVEM | Master Heavy Vest Crafting |
Throughout the existing .sbricks i found they always use the master skill, although there are familyIds for e.g. the expert skill. Im adapting this remembering that even in original ryzom they got this strange info message that you can`t gain any more XP in the master skill lvl when killing low mobs even though you not yet reached that master skill.
All items, skills and plans etc. need an icon to show ingame. Here is a short list, find others in the ryzom_assets:
| icon | description |
|---|---|
| AR_botte.tga | icon for boots |
| AR_hand.tga | icon for gloves |
| AR_pantabotte.tga | icon for pants |
| AR_armpad.tga | icon for sleeves |
| AR_gilet.tga | icon for vest |
| AR_helmet.tga | icon for helmet |
| BK_matis.tga | matis background |
| BK_fyros.tga | fyros background |
| BK_tryker.tga | tryker background |
| BK_zorai.tga | zorai background |
Creating Armor SItem
So first we are looking for some nice armor to add. For this step you need to unpack the characters_shapes.bnp. Now skim through the .shape files with the Nel object viewer or the new object_viewer_qt until you find a pleasing one. If you want the shape to have textures provide them from the ryzom assets. They can be found in e.g. $ASSETS_PATH/Stuff/Matis/Agents/_textures/Actors
WARNING : Next command lines are time consumming and disk space consumming !!
ryzom client size is aroung 7.2Gb after bnp extraction !
find $CLIENT_HOME | grep -P "\.bnp$" | sed -r 's@(.*)@'"$RYZOM_HOME"'/code/build/bin/bnp_make /u \1@g;/./!d' > /tmp/toto
var=`wc -l /tmp/toto | sed -r "s/([0-9]+).*/\1/"`
for i in `seq 1 $var`;do toto=`head -n $i /tmp/toto | tail -n 1`; `$toto` ;done
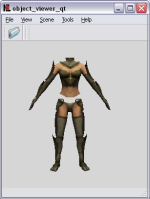 File view with object viever qt (ovqt)
As my toon is matis and female im choosing MA_HOF_armor00_gilet.shape (MA = Matis; HOF = Homin Female). The male shape would be MA_HOM_armor00_gilet.shape (can be found in $CLIENT_HOME/data/characters_shapes/ corresponding to characters_shapes.bnp)
Ok so now its time to actually write the georges files.
Switch over to your leveldesign directory to the corresponding sitem armor folder.
cd $RYZOM_HOME/code/ryzom/common/data_leveldesign/leveldesign/game_element/sitem/armor/matis/light_armor
There you'll find the already provided matis light armor boots file
icmalb.sitem
We are lazy and just copy this file. Now rename it according to your desired item (see filenaming above). As i want to have a matis light vest i'll name it icmalv.sitem
Open it and you should see something like this:
As you can see there's also a parent defined which declares some standard matis armor values. We dont need it at the moment but if you want to have a look at it you'll find the file at leveldesign/game_element/sitem/armor/_parent/matis
So now we need to change the values to match a vest (already modified file provided below) :
- change the "
EquipmentSlot" fromValue="Feet"toValue="Chest" (line 10) - change the "
CraftPlan" to "bcmaea11.sbrick". This is the needed corresponding sbrick file i mentioned earlier. We will create it later. (line 13) - change "
shape" and "shape_female" to the shape names we found out earlier (MA_HOM_armor00_gilet.shapeandMA_HOF_armor00_gilet.shape) (lines 16 ; 17) - change "
icon" to "AR_gilet.tga" (see icons above) (line 19) - if you like you can add another "
ATOM" below "icon background" in the "3D" "STRUCT". Name it "color" and give it the value "White" (Black, Beige, Green, Red, Turquoise, Blue, Violet are also available) (between lines 20-21) - save the file which should now look something like this:
Creating Armor SBrick
So far so good! Now we need to add the brick for crafting. Have a look into the sbrick folder
ls $RYZOM_HOME/code/ryzom/common/data_leveldesign/leveldesign/game_element/sbrick/craft/effect/armor/matis/light_armor
Remember, we changed bcmaea07.sbrick into bcmaea11.sbrick on the .stiem file (see above).
So the craft plan for icmalv.sitem will be bcmaea11.sbrick. We will start from bcmaea07.sbrick to build bcmaea11.sbrick
Again we are going to change it now to resemble a vest craft plan
- change IndexInFamily to 11 as this is the 11th item in the BCMAEA family (line 6)
- change Skill to SCALVEM (Master Light Vest Crafting) (line 10)
- change icon to AR_gilet.tga (line 15)
- change "Crafted Item" to icmalv.sitem (line 24)
- for simplicity i shortened the raw material list :)
Finally your file should look something like this:
Make it available on server and client
Well, we have come a long way :) Now its time to test it!
- Build the sheet_id.bin with the make_sheet_id tool and copy it to the user dir in your game client dir
$RYZOM_HOME/code/build/bin/make_sheet_id -o$RYZOM_HOME/code/ryzom/common/data_leveldesign/leveldesign/Game_elem/sheet_id.bin $RYZOM_HOME/code/ryzom/common/data_leveldesign/leveldesign/Game_elem/ $RYZOM_HOME/code/ryzom/common/data_leveldesign/leveldesign/World
mkdir -p $CLIENT_HOME/user/
cp $RYZOM_HOME/code/ryzom/common/data_leveldesign/leveldesign/Game_elem/sheet_id.bin $CLIENT_HOME/user/
- Create new .packed_sheets files to send to client.
cp $RYZOM_HOME/code/build/bin/sheets_packer $RYZOM_HOME/code/ryzom/tools/sheets_packer
cd $RYZOM_HOME/code/ryzom/tools/sheets_packer
./sheets_packer
cp visual_slot.tab $RYZOM_HOME/code/ryzom/common/data_common/visual_slot.tab
cp visual_slot.tab $CLIENT_HOME/user/
cp $RYZOM_HOME/code/ryzom/client/data/*.packed_sheets $CLIENT_HOME/user/
- Remove .packed_sheets from the server.
rm -f $RYZOM_HOME/code/ryzom/server/data_shard/*.packed_sheets
- Restart server
shard start
Make sure the two files we created are existing in the correct dir in your leveldesign dir and that they contain the content i explained before
start your client and let him connect to your server
when ingame select your char and type the following command into the chat
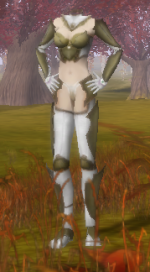
/a createItemInBag icmalv.sitem 1 25
you should now have the new item in your inventory, congratz :D
Tutorial Videos
Part 1
Part 2
Part 3
Add armor to merchant
Let's say we want to add our previously created vest to the existing light armor mechant.
Edit $RYZOM_HOME/code/ryzom/common/data_leveldesign/primitives/newbieland/urban_newbieland.primitive and search for :
<PROPERTY TYPE="string_array">
  <NAME>chat_parameters</NAME>
  <STRING>shop : NEWBIELAND_LARMOR_ALL</STRING>
  <STRING>item : icmalb.sitem 10</STRING>
  <STRING>item : icmalb.sitem 20</STRING>
  <STRING>item : icmalb.sitem 50</STRING>
  <STRING>item : icfalb.sitem 10</STRING>
  <STRING>item : icfalb.sitem 20</STRING>
  <STRING>item : icfalb.sitem 50</STRING>
  <STRING>item : ictalb.sitem 10</STRING>
  <STRING>item : ictalb.sitem 20</STRING>
  <STRING>item : ictalb.sitem 50</STRING>
  <STRING>item : iczalb.sitem 10</STRING>
  <STRING>item : iczalb.sitem 20</STRING>
  <STRING>item : iczalb.sitem 50</STRING>
</PROPERTY>
That's the list of items, the merchant is already selling.
We will add our vest to the end of the list:
<STRING>item : icmalv.sitem 10</STRING>
The number following the sitem is the level of the item.
- Save the file and place it on your server
- Start your server
- Your vest should be available in the light armor merchant list
Tutorial Videos
Full Video
Add crafting plan to trainer (todo)
Todo
Adding Spells
As for the current system a spell consists of different components:
- The general type (heal, damage, affliction etc.)
- An effect type for that general type (e.g. cold and acid are dmg spell effects)
- The explicit spell level component (eventually while leveling you can e.g. replace your old boring acid damage spell lvl 4 with the brand new lvl 5)
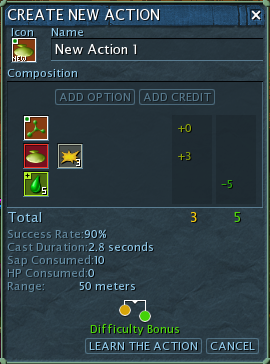
- Options for the spell like area damage or ricochet
- Credits to equal the costs of the spell (common credits are Mana (SAP as with ryzom ;) ) or cast time etc.)
Add cold spell
So lets start with something easy. Fortunately WinchGate provided us with an example acid spell which we will take as guideance.
So first head over to your sbrick dir.
We already have the general damage spell component which is defined in the bmpa01.sbrickfile but as we are going to do another damage spell, we can ignore it for now.
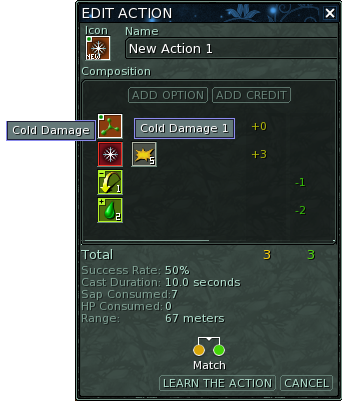
Creating the cold damage spell effect
The acid spell effect is defined in the bmoetea01.sbrick file. Copy it, name it bmoetea02.sbrick and open it so we can change it accordingly to the cold effect. You should see something like this:
<?xml version="1.0"?>
<FORM Revision="$Revision: 1.3 $" State="modified">
  <STRUCT>
    <STRUCT Name="Basics">
      <ATOM Name="FamilyId" Value="BMOETEA"/>
      <ATOM Name="SabrinaCost" Value="0"/>
      <ATOM Name="SPCost" Value="37"/>
      <ATOM Name="LearnRequiresOneOfSkills" Value="SM 0"/>
      <ATOM Name="Action Nature" Value="OFFENSIVE_MAGIC"/>
      <ATOM Name="Skill" Value="SMOEAEM"/>
    </STRUCT>
    <STRUCT Name="Client">
      <ATOM Name="Icon" Value="ICO_Acid.tga"/>
      <ATOM Name="IconBack" Value="EF_Back.tga"/>
    </STRUCT>
    <STRUCT Name="Parameter">
      <ATOM Name="f0" Value="BMOETMA"/>
    </STRUCT>
  </STRUCT>
</FORM>
- Change Icon to
ICO_Cold.tga - Change the
f0 Parameterto BMOETMC family since this is going to be a cold spell effect
Note: Offensive Magic Damage families in ryzom so far are
* BMOETMA    Acid Damage
* BMOETMC    Cold Damage
* BMOETMR    Rot Damage
* BMOETME    Electricity Damage
* BMOETMF    Fire Damage
* BMOETMP    Poison Damage
* BMOETMS    Shockwave Damage
Creating the cold damage component
The provided acid spell damage is defined in the bmoetma00003.sbrick file. Copy it, name it bmoetmc00005.sbrick and open it so we change it accordingly to the cold damage. You should see something like this:
<?xml version="1.0"?>
<FORM Revision="$Revision: 1.12 $" State="modified">
  <STRUCT>
    <STRUCT Name="Basics">
      <ATOM Name="FamilyId" Value="BMOETMA"/>
      <ATOM Name="IndexInFamily" Value="1"/>
      <ATOM Name="SabrinaCost" Value="3"/>
      <ATOM Name="SPCost" Value="7"/>
      <ATOM Name="Property 0" Value="MA: moet"/>
      <ATOM Name="Property 1" Value="MA_DMG: 15: 0: 0"/>
      <ATOM Name="Property 2" Value="MA_DMG_TYPE: acid"/>
      <ATOM Name="Property 4" Value="SET_BEHAVIOUR:CAST_ACID"/>
      <ATOM Name="Property 5" Value="MA_END"/>
      <ATOM Name="LearnRequiresOneOfSkills" Value="SM 0"/>
      <ATOM Name="Action Nature" Value="OFFENSIVE_MAGIC"/>
    </STRUCT>
    <STRUCT Name="Client">
      <ATOM Name="Icon" Value="ICO_Power.tga"/>
      <ATOM Name="IconBack" Value="PA_Back.tga"/>
    </STRUCT>
  </STRUCT>
</FORM>
- Change the
FamilyIdto the cold family which is BMOETMC - Since this is the first level of our new cold spell leave the familyIndex at 1. If you add more later remember to increment this number
- Change the sabrina costs as you like, ill leave it at 3 so i can create the spell with the existing spell credits
Property 1defines how much damage the spell does to which value. The order is hp:sap:sta- Change
Property 2to MA_DMG_TYPE: cold - Change
Property 4to SET_BEHAVIOUR:CAST_COLD
Time to test it!
- Build the sheet_id.bin with the make_sheet_id tool and copy it to the user dir in your game client dir
- Build the .packed_sheets with the sheets_packer and copy it to the same location
- Copy your newly created sheets on the server and delete all .packed_sheets from the server/data_shard dir if existing
- Make sure the two files we created are existing in the correct dir in your leveldesign dir and that they contain the content i explained before
- Start your server
- Start your client and let him connect to your server
- When ingame select your char and type the following command into the chat
/a learnBrick bmoetea02.sbrick
/a learnBrick bmoetmc00005.sbrick
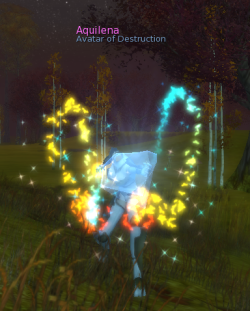
- You should now be able to create a cold damage spell, congratz :D
Add heal spell
So now we are going to add something more complex. For the heal spell we need to define a new generic spell type, the new spell effect and the actual spell level.
Switch to your sbrick folder and find the bmpa01.sbrick file, copy it and rename it to bmpa04.brick. This file will define the new generic type for heal spells. Open it and it should look something like this:
<?xml version="1.0"?>
<FORM Revision="$Revision: 1.0 $" State="modified">
  <STRUCT>
    <STRUCT Name="Basics">
      <ATOM Name="FamilyId" Value="BMPA"/>
      <ATOM Name="SabrinaCost" Value="0"/>
      <ATOM Name="LearnRequiresOneOfSkills" Value="SM 0"/>
      <ATOM Name="Action Nature" Value="OFFENSIVE_MAGIC"/>
      <ATOM Name="MinCastTime" Value="28"/>
    </STRUCT>
    <STRUCT Name="Client">
      <ATOM Name="Icon" Value="ICO_Atysian.tga"/>
      <ATOM Name="IconBack" Value="MP_Back_Offensive.tga"/>
    </STRUCT>
    <STRUCT Name="Mandatory">
      <ATOM Name="f0" Value="BMOETEA"/>
    </STRUCT>
    <STRUCT Name="Optional">
      <ATOM Name="f0" Value="BMOF"/>
      <ATOM Name="f1" Value="BMOG"/>
      <ATOM Name="f2" Value="BMOH"/>
      <ATOM Name="f3" Value="BMOV"/>
	    <ATOM Name="f4" Value="BMOR"/>
    </STRUCT>
    <STRUCT Name="Credit">
      <ATOM Name="f0" Value="BMCA"/>
      <ATOM Name="f1" Value="BMCR"/>
      <ATOM Name="f2" Value="BMCC"/>
      <ATOM Name="f3" Value="BMCP"/>
    </STRUCT>
  </STRUCT>
  <LOG/></FORM>
- Change the
Action NaturetoCURATIVE_MAGICwhich is the coded family for heal spells. - If you want you can change the
MinCastTime. The old value28means it will take 2.8s to cast this spell. A value of20would mean 2.0s cast time. - Change the
IcontoICO_Celestial.tga - Change
IconBacktoMP_Back_Curative.tga - Change the
f0atom fromMandatorytoBMDHTEAwhich is the heal effect family - I did remove the
f3atom fromOptionalbecause it is the Vampirism efecct which doesnt make sense for a heal spell; i think this was said somewhere in the source code too
Creating the heal spell effect
Now find the bmoetea01.sbrick file, copy and rename it to bmdhtea01.sbrick. The content of this file which previously defined the acid spell effect will now be adjusted to define a heal hp spell effect. Open it and it should look something like this:
<?xml version="1.0"?>
<FORM Revision="$Revision: 1.0 $" State="modified">
  <STRUCT>
    <STRUCT Name="Basics">
      <ATOM Name="FamilyId" Value="BMOETEA"/>
      <ATOM Name="SabrinaCost" Value="0"/>
      <ATOM Name="SPCost" Value="37"/>
      <ATOM Name="LearnRequiresOneOfSkills" Value="SM 0"/>
      <ATOM Name="Action Nature" Value="OFFENSIVE_MAGIC"/>
      <ATOM Name="Skill" Value="SMOEAEM"/>
    </STRUCT>
    <STRUCT Name="Client">
      <ATOM Name="Icon" Value="ICO_Acid.tga"/>
      <ATOM Name="IconBack" Value="EF_Back.tga"/>
    </STRUCT>
    <STRUCT Name="Parameter">
      <ATOM Name="f0" Value="BMOETMA"/>
    </STRUCT>
  </STRUCT>
</FORM>
- Change the
FamilyIdtoBMDHTEA - Change the
Action NaturetoCURATIVE_MAGIC - Change the
SkilltoSMDHAEM - Change the
IcontoICO_Heal.tga - Change the
f0Parameter toBMDHTMP
Creating the heal level component
Now find the bmoetma00003.sbrick file, copy and rename it to bmdhtmp00005.sbrick. The content of this file which previously defined the acid spell level will now be adjusted to define the heal hp spell level. Open it and it should look something like this:
<?xml version="1.0"?>
<FORM Revision="$Revision: 1.0 $" State="modified">
  <STRUCT>
    <STRUCT Name="Basics">
      <ATOM Name="FamilyId" Value="BMOETMA"/>
      <ATOM Name="IndexInFamily" Value="1"/>
      <ATOM Name="SabrinaCost" Value="3"/>
      <ATOM Name="SPCost" Value="7"/>
      <ATOM Name="Property 0" Value="MA: moet"/>
      <ATOM Name="Property 1" Value="MA_DMG: 15: 0: 0"/>
      <ATOM Name="Property 2" Value="MA_DMG_TYPE: acid"/>
      <ATOM Name="Property 4" Value="SET_BEHAVIOUR:CAST_ACID"/>
      <ATOM Name="Property 5" Value="MA_END"/>
      <ATOM Name="LearnRequiresOneOfSkills" Value="SM 0"/>
      <ATOM Name="Action Nature" Value="OFFENSIVE_MAGIC"/>
      <ATOM Name="MinCastTime" Value="30"/>
      <ATOM Name="MaxCastTime" Value="130"/>
    </STRUCT>
    <STRUCT Name="Client">
      <ATOM Name="Icon" Value="ICO_Power.tga"/>
      <ATOM Name="IconBack" Value="PA_Back.tga"/>
    </STRUCT>
  </STRUCT>
</FORM>
- Change the
FamilyIdtoBMDHTMP - Change the
Property 0toMA: mdht - Change the
Property 1toMA_HEAL: 15: 0: 0 - Delete the
Property 2, we dont need a dmg type - Change the
Property 4toSET_BEHAVIOUR:CAST_HEALHP - Change the
Action NaturetoCURATIVE_MAGIC
Time to test it!
- Build the sheet_id.bin with the make_sheet_id tool and copy it to the user dir in your game client dir
- Build the .packed_sheets with the sheets_packer and copy it to the same location
- Copy your newly created sheets on the server and delete all .packed_sheets from the server/data_shard dir if existing
- Make sure the three files we created are existing in the correct dir in your leveldesign dir and that they contain the content i explained before
- Start your server
- Start your client and let him connect to your server
- When ingame select your char and type the following command into the chat
/a learnBrick bmpa04.sbrick
/a learnBrick bmdhtea01.sbrick
/a learnBrick bmdhtmp00005.sbrick
- You should now be able to create a heal spell, congratz :D
Add sap credit
Ryzom Core provides a sap credit 2 defined in bmca00002.sbrick.
Let's create a sap credit 5.
Copy the previous file and name it bmca00005.sbrick.
Then open it to create the desire sap credit.
You should see something like this:
<?xml version="1.0"?>
<FORM Revision="$Revision: 1.17 $" State="modified">
  <STRUCT>
    <STRUCT Name="Basics">
      <ATOM Name="FamilyId" Value="BMCA"/>
      <ATOM Name="IndexInFamily" Value="2"/>
      <ATOM Name="SabrinaCost" Value="-2"/>
      <ATOM Name="SPCost" Value="3"/>
      <ATOM Name="Property 1" Value="SAP: 7"/>
      <ATOM Name="LearnRequiresOneOfSkills" Value="SM 0"/>
      <ATOM Name="Action Nature" Value="UNKNOWN"/>
    </STRUCT>
    <STRUCT Name="Client">
      <ATOM Name="Icon" Value="ICO_Sap.tga"/>
      <ATOM Name="IconBack" Value="CP_Back.tga"/>
      <ATOM Name="IconOver" Value="CP_Over_More.tga"/>
    </STRUCT>
  </STRUCT>
</FORM>
- Change the
IndexInFamilyto5, that's the 5th credit in the family - Change the
SabrinaCostto-5, the value of the credit - Change the
Property 1toSAP: 10, the sap cost of the credit
Time to test it!
- Build the sheet_id.bin with make_sheet_id, copy it to your client user folder
- Build the .packed_sheets with sheets_packer, copy everything in the same folder
- Copy your newly created sheets on the server and delete all .packed_sheets from code/ryzom/server/data_shard
- Place the new brick in your server
- Start your server
- Connect your client to your server
- Type the following command in your client
/a learnBrick bmca00005.sbrick
- You should have a new sap credit available now.
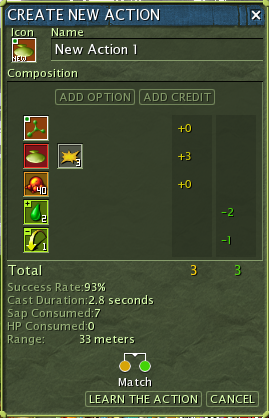
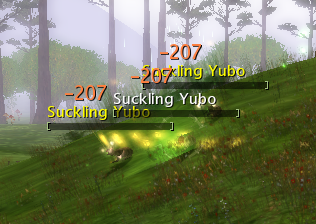
Add bomb effect
The bomb effect allows us to hit multiple targets.
Let's create our own file this time.
We will use an existing sheet name.
Create a new file and name it bmof00040.sbrick.
Then paste the following content:
<?xml version="1.0"?>
<FORM Revision="$Revision: 1.0 $" State="modified">
  <STRUCT>
    <STRUCT Name="Basics">
      <ATOM Name="FamilyId" Value="BMOF"/>
      <ATOM Name="IndexInFamily" Value="1"/>
      <ATOM Name="SabrinaCost" Value="0"/>
      <ATOM Name="SPCost" Value="7"/>
      <ATOM Name="Property 0" Value="AREA_BOMB: 20: 0.9: 5"/>
      <ATOM Name="Property 1" Value="AREA_TARGETS: 0.9: 5"/>
      <ATOM Name="LearnRequiresOneOfSkills" Value="SM 0"/>
      <ATOM Name="Action Nature" Value="UNKNOWN"/>
    </STRUCT>
    <STRUCT Name="Client">
      <ATOM Name="Icon" Value="ICO_Bomb.tga"/>
      <ATOM Name="IconBack" Value="OP_Back.tga"/>
    </STRUCT>
  </STRUCT>
</FORM>
Let's try to understand the syntax.
- Set the
FamilyIdtoBMOF, that's the base name of the sheet family - Set the
IndexInFamilyto1, it's the 1st effect in the family - Set the
SabrinaCostto0,
we are setting the sap cost of the effect to0, that way we don't need more sap credits - Set the
Property 0toAREA_BOMB: 20: 0.9: 5,
the syntaxAREA_BOMB: Radius: MinFactor: MaxTargets - Set the
Property 1toAREA_TARGETS: 0.9: 5,
the syntaxAREA_TARGETS: TargetFactor: MaxTargets - Set the
Action NaturetoUNKNOWN,
the bomb effect can be use with both the acid spell and the healing spell - Set the
IcontoICO_Bomb.tga, the foreground icon - Set the
IconBacktoOP_Back.tga, the background icon
Time to test it!
- Build the sheet_id.bin with make_sheet_id,
copy it to your client user folder - Build the .packed_sheets with sheets_packer,
copy everything in the same folder - Copy your newly created sheets on the server and delete all .packed_sheets from
code/ryzom/server/data_shard - Place the new brick in your server
- Start your server
- Connect your client to your server
- Type the following command in your client
/a learnBrick bmof00040.sbrick
- You should have a bomb effect available now.
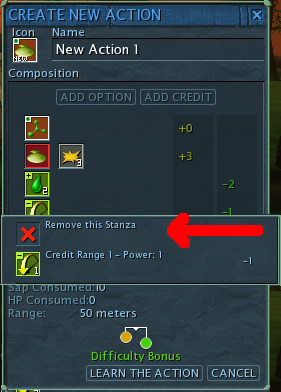
Add removal brick
We need a brick to remove the stanzas in our actions.
We will create a dummy brick for that purpose.
Create a new file and name it big_remove.sbrick.
Then paste the following content:
<?xml version="1.0"?>
<FORM Revision="$Revision: 1.0 $" State="modified">
  <STRUCT>
    <STRUCT Name="Client">
      <ATOM Name="Icon" Value="No_Action.tga"/>
    </STRUCT>
  </STRUCT>
</FORM>
- Set the
IcontoNo_Action.tga, the icon of our dummy brick
Time to test it!
- Build the sheet_id.bin with make_sheet_id,
copy it to your client user folder - Build the .packed_sheets with sheets_packer,
copy everything in the same folder - Copy your newly created sheets on the server and delete all .packed_sheets from
code/ryzom/server/data_shard - Place the new brick in your server
- Start your server
- Connect your client to your server
- Type the following command in your client
/a learnBrick big_remove.sbrick
- Now you've got a removal brick.
Add spell to trainer
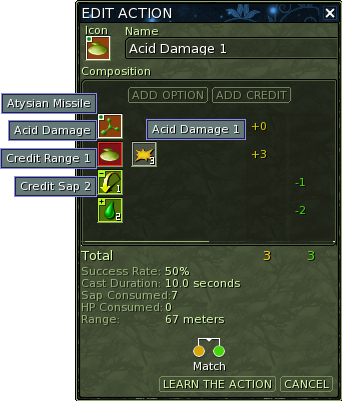
Let's add the cold spell (previously defined) to a trainer.
First, we will create a new sphrase.
Create a new file and name it abm_mt_cold_00005.sphrase.
Then paste the following content:
<?xml version="1.0"?>
<FORM Revision="$Revision: 1.0 $" State="modified">
  <STRUCT>
    <ATOM Name="brick 0" Value="bmpa01.sbrick"/>
    <ATOM Name="brick 1" Value="bmoetea02.sbrick"/>
    <ATOM Name="brick 2" Value="bmoetmc00005.sbrick"/>
    <ATOM Name="brick 3" Value="bmcr00001.sbrick"/>
    <ATOM Name="brick 4" Value="bmca00002.sbrick"/>
  </STRUCT>
</FORM>
Let's try to understand the sphrase format.
A sphrase is a list of sbrick.
We will list all the sbrick (spell, credit, effect, etc) that we need.
We will learn all of them at once:
- bmpa01.sbrick General damage spell component
- bmoetea02.sbrick Cold spell effect
- bmoetmc00005.sbrick Cold spell damage
- bmcr00001.sbrick Range credit
- bmca00002.sbrick Sap credit
Now that we have something to learn, let's add the trainer.
You can use either the World Editor or edit the primitive yourself.
If you don't know how to use the World Editor, have a look at the Using the World Editor article.
With the World Editor, open code/ryzom/common/data_leveldesign/primitives/newbieland/urban_newbieland.primitive.
Add a npc_group and call it nb_trainers.
In that groupe, add a npc_bot and enter the following properties: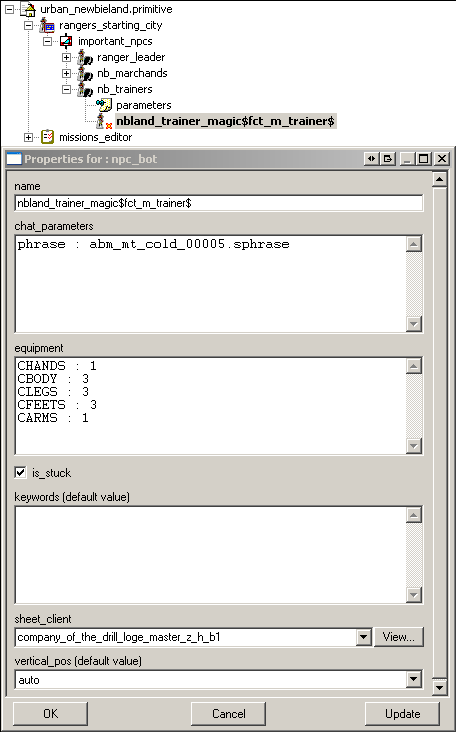
In chat_parameters, we will list all the sphrase we want.
You can move your trainer wherever you want.
Save the primitive.
Alternatively, if you don't want to use the World Editor.
Open code/ryzom/common/data_leveldesign/primitives/newbieland/urban_newbieland.primitive and add the following content:
        <CHILD TYPE="CPrimNode">
          <PROPERTY TYPE="string">
            <NAME>class</NAME>
            <STRING>npc_group</STRING>
          </PROPERTY>
          <PROPERTY TYPE="string">
            <NAME>name</NAME>
            <STRING>nb_trainers</STRING>
          </PROPERTY>
          <CHILD TYPE="CPrimNode">
            <PROPERTY TYPE="string">
              <NAME>class</NAME>
              <STRING>npc_group_parameters</STRING>
            </PROPERTY>
            <PROPERTY TYPE="string">
              <NAME>name</NAME>
              <STRING>parameters</STRING>
            </PROPERTY>
          </CHILD>
          <CHILD TYPE="CPrimAlias">
            <ALIAS VALUE="1260"/>
            <PROPERTY TYPE="string">
              <NAME>class</NAME>
              <STRING>alias</STRING>
            </PROPERTY>
            <PROPERTY TYPE="string">
              <NAME>name</NAME>
              <STRING>alias</STRING>
            </PROPERTY>
          </CHILD>
          <CHILD TYPE="CPrimPoint">
            <PT X="10313.020508" Y="-11731.011719" Z="0.000000"/>
            <PROPERTY TYPE="string_array">
              <NAME>chat_parameters</NAME>
              <STRING>phrase : abm_mt_cold_00005.sphrase</STRING>
            </PROPERTY>
            <PROPERTY TYPE="string">
              <NAME>class</NAME>
              <STRING>npc_bot</STRING>
            </PROPERTY>
            <PROPERTY TYPE="string_array">
              <NAME>equipment</NAME>
              <STRING>CHANDS : 1</STRING>
              <STRING>CBODY : 3</STRING>
              <STRING>CLEGS : 3</STRING>
              <STRING>CFEETS : 3</STRING>
              <STRING>CARMS : 1</STRING>
            </PROPERTY>
            <PROPERTY TYPE="string">
              <NAME>is_stuck</NAME>
              <STRING>true</STRING>
            </PROPERTY>
            <PROPERTY TYPE="string">
              <NAME>name</NAME>
              <STRING>nbland_trainer_magic$fct_m_trainer$</STRING>
            </PROPERTY>
            <PROPERTY TYPE="string">
              <NAME>sheet_client</NAME>
              <STRING>company_of_the_drill_loge_master_z_h_b1</STRING>
            </PROPERTY>
            <CHILD TYPE="CPrimAlias">
              <ALIAS VALUE="1261"/>
              <PROPERTY TYPE="string">
                <NAME>class</NAME>
                <STRING>alias</STRING>
              </PROPERTY>
              <PROPERTY TYPE="string">
                <NAME>name</NAME>
                <STRING>alias</STRING>
              </PROPERTY>
            </CHILD>
          </CHILD>
        </CHILD>
after the following lines (the merchant group):
              <ALIAS VALUE="146"/>
              <PROPERTY TYPE="string">
                <NAME>class</NAME>
                <STRING>alias</STRING>
              </PROPERTY>
              <PROPERTY TYPE="string">
                <NAME>name</NAME>
                <STRING>alias</STRING>
              </PROPERTY>
            </CHILD>
          </CHILD>
        </CHILD>
Time to test it!
- Place the new sphrase in your server somewhere in code/ryzom/common/data_leveldesign/leveldesign/game_element/sphrase
- Update code/ryzom/common/data_leveldesign/primitives/newbieland/urban_newbieland.primitive on your server
- Start your server
- Connect your client to your server
- Your trainer should appear next to the tower.
Making spells visible in skill tree (todo)
Todo
Troubleshooting
If not everything is working as expected enable debug infos for the EGS service on your server. Set the following parameters in EGS. Now when trying to create a armor or learn some bricks you should get some more infos in the EGS output to find the error. Of course you can also ask me in irc.
- EGS commands
- VerboseBrickManagerInfo 1
- VerboseBrickManagerDbg 1
- DisableNLDebug 0