Adding Mobs
Adding Creatures
Description
So what we're going to do is to create another creature and put it (with help by the world editor) onto newbyland.
For the sake of simplicity in this guide I oriented myself at the existing dag creature or "yubo" as it is called in-game. Of Course, the goal of Ryzom Core is not to rebuild the original Ryzom. But in my opinion it will take some time till we have e.g. some truly new creatures as this also relies heavily on source code additions. Until then it should be OK if we create some more samples to get to known with the whole process.
Personally I think the current Georges Editor has much potential but most times I'm kind of overwhelmed by the masses of editable information. So I switched to just open the actual XML files and edit them. I decided to do it for this guide as well which also saves me from making a lot of screenshots. Of course you are welcome to do it all in the official NeL tool!
Prerequisites
Look into the "Adding Game Entities" tutorial for most of the prerequisites.
Follow the Using the World Editor tutorial to get your World Editor ready.
Building sheets
Relevant yubo creature files existent in the ryzom core leveldata:
- $leveldesign$/Game_elem/Creature/fauna/bestiary/forest/chdfa1.creature
- $leveldesign$/Game_elem/Creature/fauna/Parent_creature_prototype/_dag.creature
- $leveldesign$/Game_elem/Creature/fauna/Ecosystem/forest/_dag_for.creature
- $leveldesign$/Game_elem/items/armor/creature_armor/medium_slashing_chest.item
Make a copy of each one in the respective folder and rename them to something new e.g. your desired creature name. In this tutorial ill create a "arma" creature so my renamed files are:
- arma.creature
- _arma.creature
- _arma_for.creature
- arma_chest.item
- The files with the underscore ("_") in front are just parent files which are simplifying creation of more than one arma like creature by defining some general "arma" values.
- For the correct file names unpack the fauna_shapes.bnp and fauna_skeletons.bnp (see "Adding Game Entities" if you don't know how to do this). There you should find a lot of creatures to start with.
Open the arma.creature file
replace
<PARENT Filename="_dag_for.creature"/>
with
<PARENT Filename="_arma_for.creature"/>
- change any stat value you want like "life"
Open the _arma_for.creature file
replace
<PARENT Filename="_dag.creature"/>
with
<PARENT Filename="_arma.creature"/>
Open the _arma.creature file
- replace in
Basicsstruct<ATOM Name="Race" Value="dag"/>
with<ATOM Name="Race" Value="arma"/>
replace the
Equipmentstruct with the following<STRUCT Name="Equipment"> <STRUCT Name="Body"> <ATOM Name="Item" Value="arma_chest.item"/> </STRUCT> <STRUCT Name="Legs"> <ATOM Name="Item" Value="medium_slashing_legs.item"/> </STRUCT> <STRUCT Name="Arms"> <ATOM Name="Item" Value="medium_slashing_arms.item"/> </STRUCT> <STRUCT Name="Hands"> <ATOM Name="Item" Value="medium_slashing_hands.item"/> </STRUCT> <STRUCT Name="Feet"> <ATOM Name="Item" Value="medium_slashing_feet.item"/> </STRUCT> <STRUCT Name="Head"> <ATOM Name="Item" Value="medium_slashing_head.item"/> </STRUCT> </STRUCT>
replace the Skel, AnimSetBaseName and LodCharacterName atoms in the
3d datastruct with the following<ATOM Name="Skel" Value="TR_MO_Arma.skel"/> <ATOM Name="AnimSetBaseName" Value="arma"/> <ATOM Name="LodCharacterName" Value="TR_MO_arma_LOD"/>
Open arma_chest.item
replace
3dstruct with the following<STRUCT Name="3d"> <ATOM Name="shape" Value="TR_MO_Arma.shape"/> <ATOM Name="shape_female" Value="TR_MO_Arma.shape"/> </STRUCT>
So far so good, now lets recreate the .packed_sheets
- Build the sheets_id.bin with the make_sheet_id tool and copy it to the user dir in your game client dir
- Build the .packed_sheets with the sheets_packer and copy it to the same location
- Delete all .packed_sheets from the server/data_shard dir if existing
- Make sure the four files we created are existing in the correct dir in your leveldesign dir and that they contain the content i explained before
- Finally we need to add a name for our new arma
- Edit creature_en.txt in your $server_dir$/data_shard/language folder
- Edit creature_en.txt in your $client_dir$/user
- Add this line at the bottom in both files (be carefull with the tabs)
_A07A5C396E75AF9C arma My Arma a the Armas the
h2. Edit Newbyland
Note: Make sure your data_leveldesign folder is correctly linked to l: or else the neccessary files wont be found
- Fire up your world editor
- Open the newbieland.worldedit and have the fauna_newbieland.primitive loaded
- Expand the fauna_newbieland.primitive
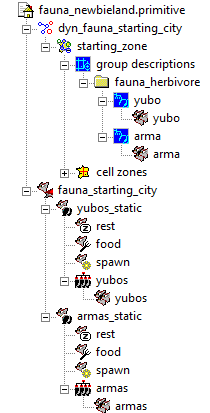
- Now right click on dyn_fauna_starting -> starting_zone -> starting zone -> group descriptions -> fauna_herbivore
- Select "Add group_template_fauna", name it "arma", give it the creature code "arma" and press "Ok"
- Right click on the new group, select "Add people", name it "arma" and select "arma" from the creature code dropdown. Also give it an appropriate count like 20
- Now right click on fauna_starting_city
- Select "Add group_fauna" and name it "armas_static"
- Right click on the new group, select "Add population" and name it "armas"
- Right click on the new population, select "Add people", name it "armas" and select "arma" from the creature code dropdown. Also give it an appropriate count like 20
- (optional) You can drag the "rest, "food" and "spawn" points to your desired location on the map
- Save everything!
Result
- Start your server
- start your client, let him connect to your server and login
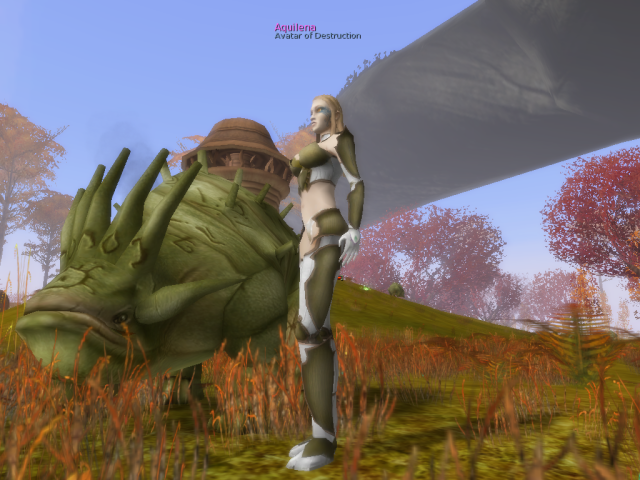
- congratz! :D

