Adding quests
Adding Quests
In this guide I will show you how to do 3 things. We will start off by adding a NPC Quest giver, we will then add a location (Hunting Grounds), and then we will create a quest to go and find the hunting grounds.
The main 3 Objectives are:
- Adding a NPC
- Adding a Place
- Adding a Quest
We will start by adding a NPC
Step 1: Adding a NPC
Step A: Open World Editor
The first thing we need to do is get our world Editor ready for use.
(If this is your first time using the world editor please see this article - Using the World Editor for information on how to get the World Editor setup for use)
Once the world editor is successfully open go to file and open up your newbieland project. Again if this is your first time in the World Editor then on the right hand side of the WE (World Editor) you will be left with just your newbieland.land file open. We are going to now add some primitives to our project.
Step B: Adding Primitives to your project
In the menu under project click on add Primitive.
For this guide we are going to be using:
urban_newbieland.primitive - (contains the NPCs for Newbieland)
region_newbieland.primitive - (Contains the regions and places for Newbieland)
Step C: Adding our first NPC
For our Quest Giver NPC we will be coping chiang_the_strong also known as Ryzom Core Welcomer in the open shard.
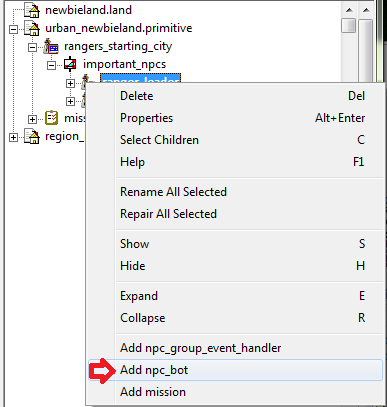
Expand urban_newbieland.primitive, rangers_starting_city, important_npcs, and ranger_leader
Right click on ranger_leader and click on Add npc_bot in the menu that comes up.
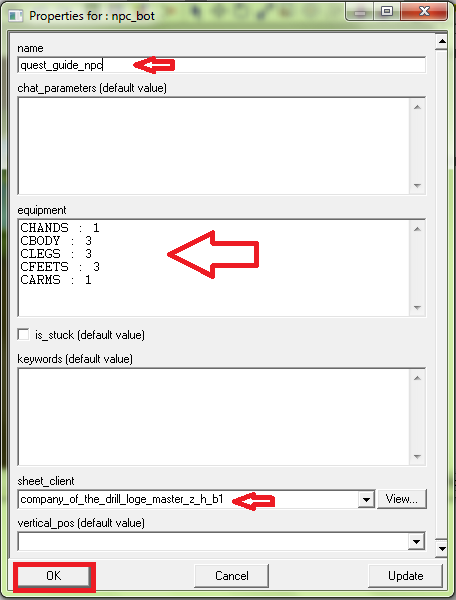
you will be presented with a properties box enter the following values:
name:
quest_guide_npc
equipment:
CHANDS : 1
CBODY : 3
CLEGS : 3
CFEETS : 3
CARMS : 1
sheetclient:
company_of_the_drill_loge_master_z_h_b1
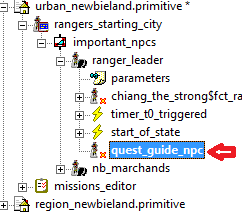
Once these values have been entered click ok.
Now you can save your project and exit the World Editor.
Step D: Possible step
On my computer I edited the directory structure and so I have to copy the files that the World Editor uses and paste them into the folder that the Server gets it's files from. I am not sure if this is a needed step with the default directory structure. The server loads newbieland.worldedit from "\code\ryzom\tools\leveldesign\install\continents\newbieland\newbieland.worldedit" So you can copy your edited newbieland.worldedit file to there for testing.
Step E: Editing the Server and Client config files
Next in order to give our NPC a name in the client we have to edit some files.
In your server folder open the data_shard/language
(my path is - C:\Users\Empire Games\Desktop\RoH Dev. Server\data_shard\language)
In the language folder there are 2 files we are going to have to edit for our NPC Quest Giver.
The first file is bot_names which should look something like this:
*HASH_VALUE bot name translated name sheet_name
_819E5006E9093123 chiang_the_strong $gn_chiang_the_strong$
We are now going to add a new line:
_819E5096F9093123 quest_guide_npc $gn_quest_guide_npc$
We give it a new Hash value, we enter the same name we gave the NPC in the world editor and we create a Variable that represents the NPC.
- Note this document is a tabbed spaced document so make sure you tab the space and not use the space bar. Also where it has 4 columns and we only use 3 make sure there is a extra tab at the end.
Next file we are going to edit is title_words_en. Find the line that says:
_E6246190EB474375 gn_chiang_the_strong Ryzom Core Welcomer
First value again is a hash value, 2nd value is the Variable we created in bot_names and the 3rd value is the name of the NPC as displayed in the client to the players.
So we are now going to create a new line:
_E6246190EB474375 gn_quest_guide_npc Quest Giver
Now save the file and the server is ready to be started up.
- Note: There are further Client side files that will need to be edited to get the name to be displayed but that will be for another Guide.
You should now be able to see your NPC Quest Giver in the location that you placed him. Congrats on placing your first NPC!
Step 2: Adding a Place
Step A: Getting ready
Now that you have successfully added a NPC Quest Giver lets add our Hunting Grounds.
Start up your World Editor and open your newbieland project again.
This time we will be working with region_newbieland.primitive so expand that folder.
In there is a folder called newbieland expand that folder as well.
You are now all set to start adding your Hunting Grounds.
Step B: Adding your place
Right click on the newbieland folder and click on Add Place.
This will bring up a Properties window. Set the following values:
name: region_newbieland_hunting_grounds
Then click ok.
You are now ready to define the boundaries of the Hunting Grounds.
Step C: Defining the Boundaries
Click on your new place (region_newbieland_hunting_grounds) and press the space bar. This will take you into edit points mode. Then press F11 which will take you into add points mode. You then are able to click on your map where ever you want the hunting grounds to go in order to set your boundaries. You need at least 3 points but can have as many points as you want in order to set the boundaries just the way you want them to be.
You now have your Hunting Grounds Defined.
Save your newbieland project and exit the World Editor.
Step D: Adding the Hunting Grounds to the Server
We now need to edit some server config files (Since the Hunting Grounds are from Ryzom their information is already in the config files however we will go through this step any ways).
Open up data_shard/language again.
Open place_words_en in a text editor.
If you did a search of the document for region_newbieland_hunting_grounds you would find the following line:
_D88CD76935E9BC0D region_newbieland_hunting_grounds Hunting grounds the
First value is the Hash value, 2nd is the name of the place you put in the world editor and the 3rd value is the name of the place as it would be seen in the client.
Now since that line is already in the file you can exit out of there. Start up your server and client and explore your world until you come to the location where you placed your hunting grounds. As you cross over into the hunting grounds it should say on your screen you have entered the Hunting Grounds or something similar.
Congrats on adding your first place!
Step 3: Adding a Quest
Step A: Getting Setup
You should now have a NPC Quest Giver and a place that you want players to go and find. Now we must create the Quest to have the player go in search of the Hunting Grounds.
Further Learning
These assignments are to help you learn more complex techniques for making Quests more enjoyable. If you have a problem figuring out a concept here then look below at the Advanced Guides section.
Assignment A:
Edit the Quest we created in Step 3 and add the pre-action Add add_compass so that the Hunting Grounds will appear on the compass at the start of the Quest.
Assignment B:
Create a 2nd quest and make the first Quest a pre_requisite for the 2nd Quest.
Assignment C:
Edit the Quest we created in Step 3 and this time add the post-action Add recv_XP so that your Magic skill gets 1000 XP.
Hint: You will need to search through your Server files to see what the Variable for Magic is.
Advanced Guides on Creating Quests
I will be creating some more advanced guides on how to improve the Quests and make them more complex. Check back here for further guides.


