Configuring Patching Services
- Matt Raykowski
Configuring Patch Server
The patch server uses a web virtual host that listens on 43435
Add new virtual host to Apache. This file may be httpd-vhosts.conf, default or a new file in the appropriate to your distribution.
Patch Server ConfigurationListen 43435
<VirtualHost *:43435>
<Directory "/home/username/ryzom/code/ryzom/tools/server/patch">
AllowOverride All
Order allow,deny
Allow from all
</Directory>
DocumentRoot "/home/username/ryzom/code/ryzom/tools/server/patch"
ServerName localhost
</VirtualHost>
- Copy generated patches to the DocumentRoot you specified.
- Create or update the Ryzom version file:
- Create a new file in the patch directory called: ryzom_open.version
- Inside the new file put current version in this format: currentVersionNumber currentVersionNumber
1 1
Ensure that all patch files (.idx and _debug.xml) have the 5 digit patch number:
Exampleryzom_00001.idx
ryzom_00001_debug.xml
- Create a new file in the patch directory called: ryzom_open.version
- Update the domain(s) database entries:
- Determine the domain ID that you will be updating. The default ID is 12.
Update the nel.domain table's patch_version field to the new version:
USE nel;
UPDATE domain SET patch_version=1 WHERE domain_id=12;
If initially configuring your patch server you will also need to modify the patch_urls field:
USE nel;
UPDATE domain SET patch_urls='http://127.0.0.1:43435/patch' WHERE domain_id=12;
Add or update the URL of patching web server to the client_default.cfg file, located in the client directory:
Example Config ChangesPatchServer = "http://127.0.0.1:43435/patch";
PatchWanted = 1;- Start client and login. Patching should commence.
Creating the Patches
Create A New Product
First generate new product by running:
patch_gen createNewProduct patch_game/game.xml
This creates default directory layout and xml files.
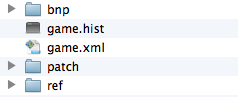
Directory Layout
- patch_game/
- bnp - put your .bnp files here
- patch - this will have generated patch files. copy these to web server
- ref - patch_gen work files
- game.hist
- game.xml
Generate Patch
Copy updated .bnp files to patch_game/bnp and run:
patch_gen updateProduct patch_game/game.xml
Example XML
<xml>
    <_Categories>
      <_Category>
          <_Name type="STRING" value="main"/>
          <_IsOptional type="SINT32" value="0"/>
          <_IsIncremental type="SINT32" value="0"/>
          <_Files type="STRING" value="main.bnp"/>
          <_Files type="STRING" value="sound.bnp"/>
          <_Files type="STRING" value="textures.bnp"/>
      </_Category>
      <_Category>
          <_Name type="STRING" value="unpacked"/>
          <_IsOptional type="SINT32" value="0"/>
          <_UnpackTo type="STRING" value="./"/>
          <_IsIncremental type="SINT32" value="1"/>
          <_Files type="STRING" value="exedll.bnp"/>
      </_Category>
      <_Category>
          <_Name type="STRING" value="optional"/>
      </_Category>
 </_Categories>
 <_IndexFileName type="STRING" value="game.hist"/>
 <_PatchDirectory type="STRING" value="patch_game/patch/"/>
 <_BnpDirectory type="STRING" value="patch_game/bnp/"/>
 <_RefDirectory type="STRING" value="patch_game/ref/"/>
 <_NextVersionFile type="STRING" value="patch_game/ryzom_open.version"/>
</xml>
<_Files> node in each category will tell which .bnp files are being tracked.Directory entries or IndexFileName can also be absolute like bnp's in 'r:/game/ryzom/data', patch will be put to 'w:/webroot/patch_game' and history is kept in 'c:/game.hist'
External Tools
You will need two additional external tools to facilitate generating the patches.
- lzma.exe can be found from http://www.7-zip.org/sdk.html
- xdelta.exe from http://evanjones.ca/software/xdelta-win32.html
On Windows 7 environments you may need to enable compatibility. To do this:
- Right click on xdelta.exe and choose Properties
- Navigate to the Compatibility tab.
- Check "Run this program in compatility mode for" in the "Compatibility Mode" section.
- Choose "Windows XP (Service Pack 3)"
- Click OK.
- Run xdelta.exe and confirm that you wish to allow the program to make changes to your system.
Patch Generated
1. Create a folder inside the client directory and name it "unpack".
2. Place the ryzom_00000.idx inside the "unpack" folder created in step number one.
The 5 digits is the server version, if your server version is 1 you will have to replace 000000 to 00001
3. Open your favorite database editor and click on "nel" then click the table "domain".
4. There's a domain with the id of 12, click to edit the fields patch_version.
5. replace "patch_version" with the version of your server version, in this case it would be 0, click save.
6. Make sure to change your client cfg file to "PatchWanted = 1;"
7. Open the client and watch it patch your client files!
Build Client for patching
Your client must be built in with FINAL_VERSION enabled.
You will need to modify the client source code to enable the client, when built in FINAL_VERSION, read the patching variables from the configuration file. In FINAL_VERSION the client will ignore these configuration variables by default.
- Edit code/ryzom/client/src/client_cfg.cpp
And add the following:
READ_STRING_FV(RingReleaseNotePath)
READ_STRING_FV(ReleaseNotePath)
Configure the client_default.cfg with the appropriate URLs:
PatchServer should be the URL to the patch_game directory.
PatchServer = "http://127.0.0.1:43435/patch";
RingReleaseNotePath = "http://127.0.0.1:43435/patch/index.php";
RingReleaseNotePath is the URL to your release notes file. The client does pass a $ver value so you can use that to have different notes per version for example in a PHP file. Here's an example:
Release Notes: index.php<html> <head> <meta http-equiv="content-type" content="text/html; charset=UTF-8"> </head> <body> <h1>Saturday, Febuary 25 2012</h1> <h2>RELEASE</h2> <p>After much work and a few years we are proud to present the first official release of Ryzom Core.</p> <br> </body> </html>