Adding Game Entities (Armor, Spells etc.)
...
Prerequisites
Here is a small list with stuff you should have ready for things to work.
- Get the source
Look here for more information
Note: For windows there are some prebuild binaries for everything (client, server, nel tools, ryzom tools). Look hereLook at Downloads for Windows to find out more.
- Client / Server
Well this should be clear but of course you need a working client to test the additions and a working server with access to it as we have to add files on it. There are a bunch of tutorials in the wiki for the plattform of your choice. E.g.:
...
As you can see there's also a parent defined which declares some standard matis armor values. We dont need it at the moment but if you want to have a look at it you'll find the file at leveldesign/game_element/sitem/armor/_parent/matis
So now we need to change the values to match a vest (already modified file provided below) :
- change the "
EquipmentSlot" fromValue="Feet"toValue="Chest" (line 10) - change the "
CraftPlan" to "bcmaea11.sbrick". This is the needed corresponding sbrick file i mentioned earlier. We will create it later. (line 13)Anchor bcmaea11 bcmaea11 - change "
shape" and "shape_female" to the shape names we found out earlier (MA_HOM_armor00_gilet.shapeandMA_HOF_armor00_gilet.shape) (lines 16 ; 17) - change "
icon" to "AR_gilet.tga" (see icons above) (line 19) - if you like you can add another "
ATOM" below "icon background" in the "3D" "STRUCT". Name it "color" and give it the value "White" (Black, Beige, Green, Red, Turquoise, Blue, Violet are also available) (between lines 20-21) - save the file which should now look something like this:
...
| Code Block | ||||||||
|---|---|---|---|---|---|---|---|---|
| ||||||||
<?xml version="1.0"?>
<FORM Revision="$Revision: 1.0 $" State="modified">
    <PARENT Filename="_gma_l.sitem"/>
    <STRUCT>
        <STRUCT Name="basics">
            <ATOM Name="name" Value="matis light vest"/>
            <ATOM Name="ItemType" Value="Light vest"/>
            <STRUCT Name="EquipmentInfo">
                <ARRAY Name="EquipmentSlots">
                    <ATOM Value="Chest"/>
                </ARRAY>
            </STRUCT>
            <ATOM Name="CraftPlan" Value="bcmaea11.sbrick"/>
        </STRUCT>
        <STRUCT Name="3d">
            <ATOM Name="shape" Value="MA_HOM_armor00_gilet.shape"/>
            <ATOM Name="shape_female" Value="MA_HOF_armor00_gilet.shape"/>
            <ATOM Name="map_variant" Value="Low Quality"/>
            <ATOM Name="icon" Value="AR_gilet.tga"/>
            <ATOM Name="icon background" Value="BK_matis.tga"/>
            <ATOM Name="color" Value="White"/>
        </STRUCT>
        <STRUCT Name="faber">
            <ATOM Name="Tool type" Value="ArmorTool"/>
        </STRUCT>
    </STRUCT>
    <LOG>created by aquiles</LOG>
</FORM> |
Creating Armor SBrick
So far so good! Now we need to add the brick for crafting. Have a look into the sbrick folder
| Code Block | ||||||
|---|---|---|---|---|---|---|
| ||||||
ls $RYZOM_HOME/code/ryzom/common/data_leveldesign/leveldesign/game_element/sbrick/craft/effect/armor/matis/light_armor |
...
| Code Block | ||||||||
|---|---|---|---|---|---|---|---|---|
| ||||||||
<?xml version="1.0"?>
<FORM Revision="$Revision: 1.22 $" State="modified">
  <STRUCT>
    <STRUCT Name="Basics">
      <ATOM Name="FamilyId" Value="BCMAEA"/>
      <ATOM Name="IndexInFamily" Value="1"/>
      <ATOM Name="SPCost" Value="30"/>
      <ATOM Name="LearnRequiresOneOfSkills" Value="SC 0"/>
      <ATOM Name="Action Nature" Value="CRAFT"/>
      <ATOM Name="Skill" Value="SCALBEM"/>
      <ATOM Name="LearnRequiresBricks" Value="bcpa10.sbrick"/>
      <ATOM Name="CivRestriction" Value="matis"/>
    </STRUCT>
    <STRUCT Name="Client">
      <ATOM Name="Icon" Value="AR_botte.tga"/>
      <ATOM Name="IconBack" Value="BK_matis_brick.tga"/>
      <ATOM Name="IconOver" Value="FP_over.tga"/>
      <ATOM Name="IconOver2"/>
    </STRUCT>
    <STRUCT Name="faber">
      <ATOM Name="Tool type" Value="ArmorTool"/>
      <ATOM Name="Item Max Level" Value="100"/>
      <STRUCT Name="Create">
        <ATOM Name="Crafted Item" Value="icmalb.sitem"/>
        <ATOM Name="Nb built items" Value="1"/>
        <ATOM Name="MP 1" Value="Raw Material for Clothes"/>
        <ATOM Name="Quantity 1" Value="2"/>
        <ATOM Name="MP 2" Value="Raw Material for Armor interior coating"/>
        <ATOM Name="Quantity 2" Value="2"/>
        <ATOM Name="MP 3" Value="Raw Material for Armor interior stuffing"/>
        <ATOM Name="Quantity 3" Value="1"/>
        <ATOM Name="MP 4" Value="Raw Material for Armor clip"/>
        <ATOM Name="Quantity 4" Value="1"/>
        <ATOM Name="MP 5"/>
        <ATOM Name="Quantity 5" Value="0"/>
      </STRUCT>
    </STRUCT>
  </STRUCT>
<LOG>Default one</LOG>
</FORM> |
Again we are going to change it now to resemble a vest craft plan
- change IndexInFamily to 11 as this is the 11th item in the BCMAEA family (line 6)
- change Skill to SCALVEM (Master Light Vest Crafting) (line 10)
- change icon to AR_gilet.tga (line 15)
- change "Crafted Item" to icmalv.sitem (line 24)
- for simplicity i shortened the raw material list :)
...
Add crafting plan to trainer (todo)
Todo
Adding Spells
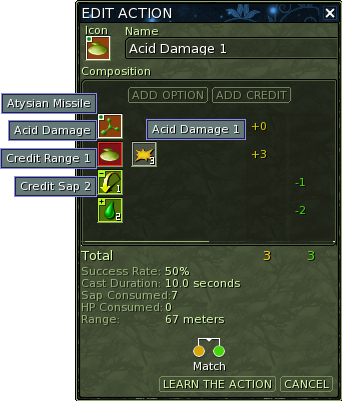
As for the current system a spell consists of different components:
- The general type (heal, damage, affliction etc.)
- An effect type for that general type (e.g. cold and acid are dmg spell effects)
- The explicit spell level component (eventually while leveling you can e.g. replace your old boring acid damage spell lvl 4 with the brand new lvl 5)
- Options for the spell like area damage or ricochet
- Credits to equal the costs of the spell (common credits are Mana (SAP as with ryzom ;) ) or cast time etc.)
...
A sphrase is a list of sbrick.
We will list all the sbrick (spell, credit, effect, etc) that we need.
We will learn all of them at once:
- bmpa01.sbrick General damage spell component
- bmoetea02.sbrick Cold spell effect
- bmoetmc00005.sbrick Cold spell damage
- bmcr00001.sbrick Range credit
- bmca00002.sbrick Sap credit
...